How To: DIY $10 Macro Photo Studio
 Today we are going to learn how to build a DIY light tent for product photography, for next to zero cost.
 Even saying it costs "$10" is a bit of a stretch, because you can probably build this mostly for free. The ten dollars assumes you cannot scrounge a cardboard box and some white tissue paper you have saved in the gift-wrap supplies box. You can get this stuff at an office supply store, but it is more fun to scrounge. Besides, we are all about re-use and recycle here at Strobist. (I can proudly report that 98% of my bad jokes are recycled!)
If you have this stuff, the only thing you will need to buy is two sheets of posterboard - black and white. Total damage would be less than $2. Don't blow the rent money.
__________
Some Basic Theory
Small flash gear is especially well suited for shooting macro shots and other small-object still life and product shots. And this little studio in a box does not even technically need a flash to work its wonders. Any bright lamp will do if you are shooting digital, because it is very easy to balance for tungsten light and get the color balance spot on.
This project is basically a light tent, albeit a very controllable one. It pretty much creates beautiful light by default. Frankly, it's very difficult to screw it up.
This is one of the most useful DIY gadgets you could make - especially when you consider the price tag.
What can you use it for? That's pretty much up to you, and will be limited only by the size of the box you use. Shots of small objects in the studio, on location, items you are selling on eBay, flowers (even still in-the-ground-and-growing ones,) Absolute Vodka bottles for $50,000 ad campaigns, catalog stuff - whatever.
This little thingie does it all in spades - and with a lot of control, too.
The secret is being able to have nice, soft, even light coming from either side or the top - or any combination of the three.
The black and white poster boards serve triple duty as light blockers, reflectors or sweep backgrounds. Not bad for 49 cents, huh?
How to Make It
I used a 12" x12" x12" box, but let your subject needs define your size. I would not go smaller than 12x12x12, tho.
Basically we are gonna cut windows in three sides of the box and totally take out one side. (That last part is optional - see below.) You'll want to tape the original bottom of the box securely into place before making your cuts. Leave two of the top flaps on for light control as shown, and remove the other two. The three-shot sequence just below shows it better than I could explain.
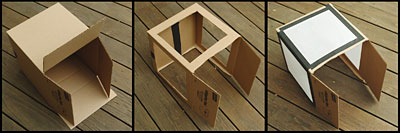
I used a razor to slice the boxes. Try not to amputate anything, okay? Besides, the arterial bleeding will saturate and weaken the cardboard.
The last photo of the three-shot sequence shows the box with the tracing paper taped over the windows. You can choose to leave the "side" of the original box that will form the bottom of your studio attached to make it stronger, but it will preclude your ability to place the box down over an object (like a plant) outside and retain the surrounding ground environment. Your choice. I'll sleep well either way.
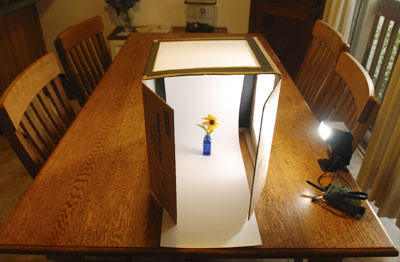
The thing could not be easier to use. You'll need at least one light source. A flash works great, as long as you can manually control the output and get it off of the camera.
But you could also use a bright lamp or work light. Just be sure to balance your camera for tungsten and put the camera on a tripod to keep it still during the exposure.
You could even use the sun, making it come from whatever direction you need by rotating the box.
The beauty of this thing is the lighting control you get. You have the ability to almost completely wrap your subject in high quality light. But if you use only one light, the tissue paper acts as a fill reflector all around your subject.
If you want to kill the reflection on the darker side, stick a square of black posterboard on that side (on the inside.) Ditto on the top.
 My favorite thing about this box is the "infinity sweep" effect you can get for a seamless bottom-to-background look. It's just a strip of posterboard.
 White and black (especially white) both work fine, but you could also use any color you wanted. You'll just have to pony up another 49 cents.
You want more lighting control? You got it. The two remaining flaps act as gobo's to block your camera from seeing the side light sources. Bingo - no flare, and very saturated colors. Simply adjust the flaps for best blocking effect.
You want the light to come from closer to a 45-degree angle? Rotate the box around a little and shoot from closer to a corner.
You want more definition on each side? Use a light source on each side. This setup puts the old "Big Tupperware Light Tent" to shame.
 The phone and radio were shot just because they happened to be sitting around the kitchen. I used another light on the camera left side of the radio for better left-side definition.
When using two light sources, you can change the relative light intensity by dialing down one of the flashes on manual, or by moving one of your lamps further away or closer. Simple as that.
 The flower you see at top of the post (a "Black-Eyed Susan") was shot with just one small flash (on 1/16th power) positioned on the camera right side of the box, with no fill other than the tissue paper. (I actually used tracing paper.)
IMO, that's some smooth overall light for just one small light source.
__________
UPDATE, Feb. 2019: Over a million people have read this article since it was first written in 2006. And a little cottage industry has popped up around store-bought versions of my cardboard macro studio. Which means you can now purchase a store-bought version, shipped via Amazon Prime in the US, for about $23.
For that price, it almost doesn't make sense to go to the trouble to make it. But either way, your product photos will look great.
__________
New to Strobist? Start here | Or jump right to Lighting 101
Got a question? Hit me on Twitter: @Strobist
Have a passport? Join me in Hanoi: X-Peditions Location Workshops
Permalink

<< Home